Note: If you are creating a link to a document/file, first add it to the Media Library using the steps to upload a file to Media or upload a file while you're editing content. Then use the steps below to make a link to the document/file while editing a page/block.
To create a link:
- Type the text/insert the image for the link.
- Select the text/click on the image.
- Click the Link button.
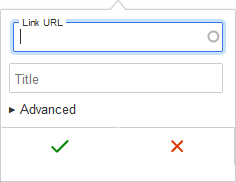
- The Edit Link tooltip will appear.
- Do one of the following:
Link to another site:
- Type or paste the complete URL in the Link URL box.
- Click the green checkmark. The Link tooltip will close.
Link to a page on this site:
- Begin typing the page's title or a keyword from the title in the Link URL field. Autocomplete will suggest matching pages.
- Select the appropriate page from the list.
- Click the green checkmark. The Link tooltip will close.
Link to a document/file in the Media Library:

- If the file is already uploaded to the website, begin typing the Name/filename in the URL field. Autocomplete will suggest matching files.
- Select the appropriate file from the list.
- Click the green checkmark. The Link tooltip will close.
- If the document/file hasn't already been uploaded:
- If you've made edits that you want to keep, save the page where you are working. Use the steps for uploading files to Media, and then return to editing your page. Follow the previous steps to make a link to the file you uploaded.
OR - Use the steps for uploading a document while editing content. Then follow the previous steps to make a link to the file you uploaded.
- If you've made edits that you want to keep, save the page where you are working. Use the steps for uploading files to Media, and then return to editing your page. Follow the previous steps to make a link to the file you uploaded.
Link to a page generated by the "Views" module (such as the calendar):
- Enter a relative URL (the segment of the URL that follows the “.org”), including the slash.
- Example: for a link to http://www.example.org/calendar/month, enter only /calendar/month
- Click the green checkmark. The Link tooltip will close.
Tips & Reminders
- Make sure to click the green checkmark to complete the link. The link will not be inserted if this step is skipped.
- Save the page after making your link.
- Test the new link to confirm it goes to the expected location.
Advanced Options
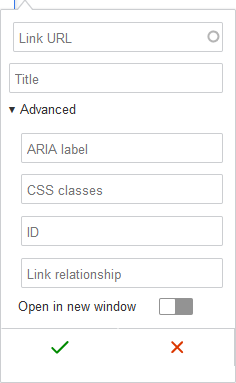
Click "Advanced" in the Link tooltip to set the following options:
- ARIA label (uncommon): Provide an alternative text value/label for assistive technologies. Example: When using link text such as "Read more," which may be repeated by other links on the page, ARIA label text can replace the link text with a more descriptive, accessible label (e.g. "Read more about XYZ specific topic"). The words 'Read more' are repeated in the aria-label (which replaces the original anchor text of "[Read more...]")
- CSS classes: List of CSS classes to add to the link, separated by spaces.
- ID: Allows linking to this content using a URL fragment. Must be unique.
- Relation: It's recommended to add "noopener" when setting a link to open in a new tab/window to prevent a security vulnerability being exploited by the linked site.
- Open in new window/tab (not recommended for most situations): "noopener" will also be added to the Relation field to prevent a security vulnerability being exploited by the linked site.
Bugs & Known Issues
Trying to make a link without clicking the green check mark
Putting a link to a document on an image (when both document and image are Media)
If you insert a Media image into a page, and then make a link to a Media document on the image, the link will fail. While editing, the link will point to "/media/NNN," but after saving it won't convert to the document's direct URL, and clicking on the link will result in a "Page not found" error. Workaround: Use the relative path to the document for links when you must link to a document on an image (e.g. /sites/www.example.org/files/samplefile.pdf). (Bug report.)